 TechFuel HQ
By LK Wood IV · 2026-06-19 · ~12 min read · St. Louis County, MO
Installing Proxmox VE is genuinely easy. The graphical installer is a few screens, and it writes itself to disk in a couple of minutes. What trips people up is not the install itself: it is the first fifteen minutes afterward, where a default install points at a repository you cannot use without paying, and the longer-term question of how you keep the thing updated once it is running.
This page is the generic reference for both. It is hardware-agnostic on purpose: the steps below apply to a mini PC, a used office desktop, an old gaming rig, or a rack server. If you want a hands-on, click-by-click walkthrough on a specific small box, the Proxmox mini PC setup guide is the hardware-specific companion to this one. If you are still choosing hardware, start with the Proxmox hardware requirements. And if you already run VE 8 and want to jump to VE 9, that is a different, planned operation covered in the 8-to-9 upgrade gotchas.
Everything below is cited to the official Proxmox documentation. The current release as of this writing is Proxmox VE 9.2-1 (released May 21, 2026), built on Debian 13 “Trixie.” If a command or file path is here, it is real and current for VE 9.
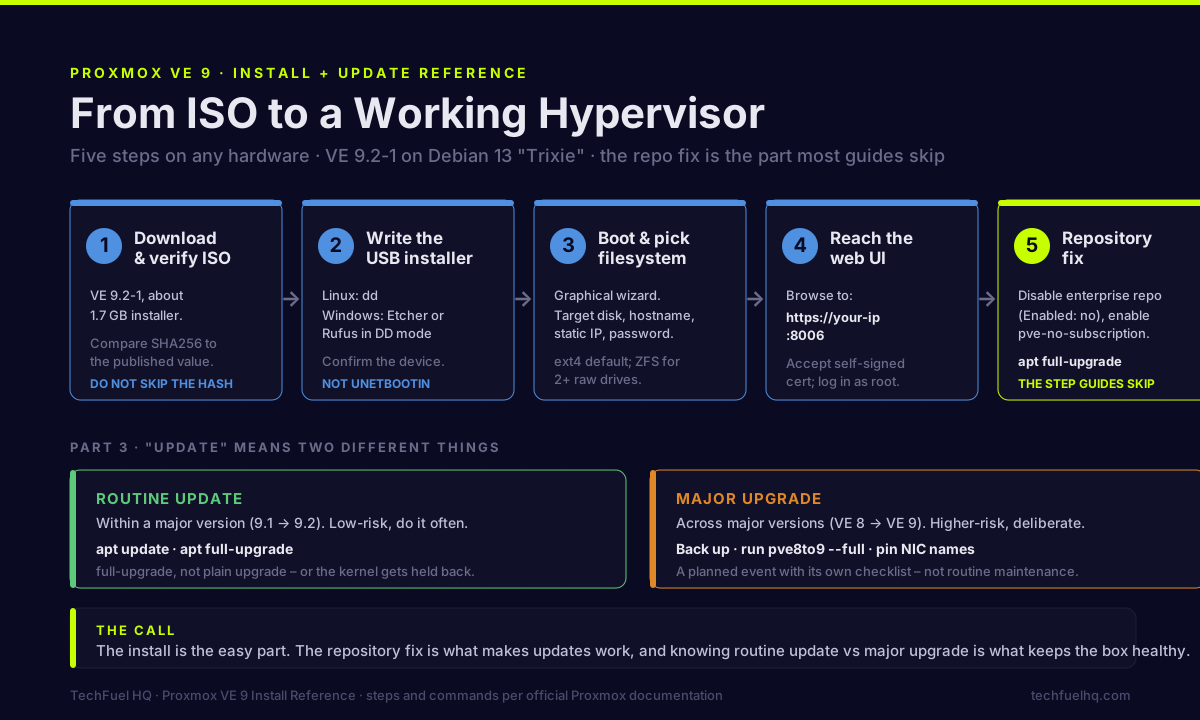
Part 1: The clean install (any hardware)
Step 1: Download and verify the ISO
Grab the latest Proxmox VE ISO from the official downloads page. As of August 2026 that is still the VE 9.2-1 installer, about 1.7 GB.
Do not skip the checksum. The download page publishes a SHA256 value next to the ISO. After downloading, compute the hash and compare it to that published value:
# Linux / macOS
sha256sum proxmox-ve_9.2-1.iso

# Windows (PowerShell)
Get-FileHash proxmox-ve_9.2-1.iso -Algorithm SHA256
If the two strings do not match, the download is corrupt or tampered with. Delete it and re-download. This takes ten seconds and it is the one verification step that matters before you write installation media.
Step 2: Write the USB installer
A USB stick is the standard install medium. The tool depends on your OS, and the official guidance is specific about which ones work:
- Linux: use
dd. Identify the USB device first withlsblk(run it before and after plugging the stick in so you are certain which device is the USB), then write:
Replacedd bs=1M conv=fdatasync if=./proxmox-ve_9.2-1.iso of=/dev/XYZ/dev/XYZwith your actual USB device. Getting this wrong overwrites the wrong disk, so confirm the device name carefully. - Windows: Etcher works with no configuration. Rufus also works, but you must select DD mode when it prompts, not ISO mode.
- macOS: convert the ISO to a raw image, then write it (see the official media-prep page for the exact
hdiutilandddsequence).
One specific warning from the docs: do not use UNetbootin. It is incompatible with the Proxmox installer.
Step 3: Boot the installer and pick your filesystem
Plug the USB into the target machine, power on, and bring up the boot menu (the key varies by vendor, commonly F11, F12, or Del). Select the USB device, then choose Install Proxmox VE from the boot menu.
The installer is a graphical wizard. Most screens are self-explanatory, but two decisions matter:
Target disk and filesystem. Select the SSD or NVMe you want Proxmox installed on, and be careful not to pick the USB installer drive by accident. The filesystem choices:
| Filesystem | When to choose it |
|---|---|
| ext4 (default) | Single-disk machine. Simple, fast, reliable, uses an LVM-thin pool Proxmox manages natively. The right first-install answer. |
| ZFS | Two or more drives and you want a mirror or RAID-Z, plus snapshots, checksums, and self-healing. Wants meaningful RAM for its cache. |
| XFS | Offered with LVM, but far less common in Proxmox setups than ext4. |
| Btrfs | A technology preview. Not recommended for a production-style install yet. |
The official installer note is blunt that ZFS on top of any hardware RAID is unsupported and can cause data loss, so if you run ZFS, give it the raw disks. For a first build on one drive, choose ext4 and move on.
Network and password. Set a hostname, then set a static IP outside your DHCP range so the web UI always lives at the same address. Set a strong root password and a notification email (real if you want system alerts, a dummy if you do not). The installer builds a Linux bridge called vmbr0 on your first NIC so VMs and containers can reach the network.
Click install. It writes to disk in a few minutes and reboots. The console then shows a URL.
Step 4: Reach the web interface
Point a browser on another machine at the IP given during install, on port 8006:
https://your-ip:8006
Note the https and the :8006 — plain http or a missing port is the single most common “it didn’t work” mistake, and the install is almost certainly fine. You will get a certificate warning because Proxmox uses a self-signed cert; accept it and log in as root with the password you set.
Part 2: The first fifteen minutes (the repository fix)
This is the part generic install guides skip, and it is the one step every Proxmox install needs. A fresh install points apt at the enterprise repository, which requires a paid subscription. Without a key, every apt update ends in 401 Unauthorized and your package lists never refresh.
Proxmox VE 9 also changed the repository file format. It moved to the deb822 .sources format, so the files look nothing like the one-line sources.list entries from VE 8 and earlier. Here is the current, correct configuration.
Disable the enterprise repository
Open the node shell (web UI → your node → Shell) and edit the enterprise sources file:
nano /etc/apt/sources.list.d/pve-enterprise.sources
Add a single line to that entry so it reads Enabled: no. That suppresses the enterprise repo without deleting it.
Enable the no-subscription repository
Create the no-subscription sources file with the exact deb822 contents the docs publish for VE 9:
# /etc/apt/sources.list.d/proxmox.sources
Types: deb
URIs: http://download.proxmox.com/debian/pve
Suites: trixie
Components: pve-no-subscription
Signed-By: /usr/share/keyrings/proxmox-archive-keyring.gpg
You can do all of this from the web UI instead, with no text editing: node → Updates → Repositories → Add, pick No-Subscription from the dropdown, then highlight the enterprise row and click Disable. The GUI writes the same files for you.
The no-subscription repo ships the same packages as enterprise without a key. Proxmox is explicit that these packages are “not always as heavily tested and validated,” so it is fine for a home lab or test cluster but is not their recommendation for production. For most homelabbers that is an acceptable trade, and the no-subscription repo is what the vast majority run.
Run the first update
Now that apt points at a repo you can actually use, pull updates:
apt update
apt full-upgrade
Use full-upgrade, not plain upgrade — more on why in Part 3. Reboot if a new kernel was installed, and you are on the latest VE 9 point release.
The login popup reminding you to buy a subscription is cosmetic. It does not affect anything. Click OK and move on; the only repository change that matters is the one you just made.
Part 3: How to update Proxmox over time
Once Proxmox is running, “update” means two very different things, and conflating them is where homelabs get into trouble.
Routine updates (within a major version)
This is normal maintenance: keeping VE 9 current as point releases ship (9.1 to 9.2 and so on). Two equivalent ways:
From the shell:
apt update
apt full-upgrade
From the web UI: select the node, open Updates, click Refresh to pull the package lists, then Upgrade to apply them.
Why full-upgrade and not apt upgrade? Plain upgrade refuses to install anything that requires a new dependency, and on Proxmox that means the kernel and the pve-manager stack get held back — exactly the packages you want updated. full-upgrade (the apt equivalent of dist-upgrade) installs them. A reboot is only needed when a new kernel arrives. There is no rush to apply every point release the day it lands; updating on a comfortable cadence is fine.
Major upgrades (across major versions)
Moving from VE 8 to VE 9 is a different animal. It crosses to a new major version, which also moves the underlying Debian base and kernel, and it carries real breaking changes: LVM autoactivation defaults change, network interfaces can be renamed by the newer kernel, and PCI passthrough can need attention. That is a planned event with its own pre-flight checklist — back up first, run the pve8to9 --full checker, pin your NIC names, and have console access that is not the web GUI.
Do not run a major upgrade as part of routine maintenance. The full procedure, the gotchas, and the order of operations for clusters are in the dedicated Proxmox VE 8 to 9 upgrade guide. Do plan it, though: Proxmox’s support lifecycle table lists VE 8’s end of life as 2026-08 — that is this month, not a future deadline — and the Debian 12 “Bookworm” base it rides on hit its security-support end in 2026-07. An 8.4 box will keep running, but it is now an unpatched platform, so the upgrade is a task to schedule rather than defer.
The short version of the distinction: routine updates are low-risk and you do them often; major upgrades are higher-risk and you do them deliberately.
Common install gotchas
A handful of issues account for most “fresh install” frustration:
apt updatereturns 401 Unauthorized. You are still on the enterprise repository. Disable it and enablepve-no-subscription(Part 2). This is the number-one new-user issue.- The web UI will not load. You used
httpinstead ofhttps, or forgot:8006. The correct URL ishttps://your-ip:8006. The install is fine. - VMs will not start (“KVM not available”). Hardware virtualization (Intel VT-x or AMD-V) is disabled in the BIOS/UEFI. Reboot into firmware and enable it. If you also plan GPU or NIC passthrough, enable IOMMU (VT-d / AMD-Vi) while you are in there.
- You picked ZFS and the host feels short on RAM. ZFS reserves RAM for its cache. Size it deliberately; the hardware requirements page covers the ZFS RAM rule.
- You accidentally installed onto the USB stick. Always confirm the target disk in the installer is your internal SSD/NVMe, not the installer drive.
After the install: what to build
With Proxmox installed, updated, and pointed at the right repository, you have a working hypervisor. The next decisions are about what to run on it:
- For a guided, screen-by-screen walkthrough on a specific small machine — including BIOS keys, the first VM, and the first container — follow the Proxmox mini PC setup guide.
- For each service, decide between a container and a full VM. The LXC vs VM in Proxmox guide has the decision tree; containers are lighter and start in seconds, VMs give full isolation.
- To size your box — how many VMs and containers your RAM and cores can actually support, with ZFS overhead included — the Proxmox capacity planner does the math.
The install is the easy part. The repository fix is the part that makes updates work, and knowing the difference between a routine update and a major upgrade is what keeps the box healthy for years.
Sources
- Proxmox VE Package Repositories — the deb822
.sourcesformat for VE 9, the exactproxmox.sourcesno-subscription entry, the enterprise repo andEnabled: nodisable, the “not as heavily tested” note, and the GUI Repositories panel. - Proxmox VE Installation — installer filesystem options (ext4/XFS/ZFS/Btrfs preview), the ZFS-on-hardware-RAID warning, and the
https://youripaddress:8006web interface URL. - Proxmox VE: Prepare Installation Media — the
ddcommand for Linux, Etcher/Rufus-DD-mode for Windows, the macOS sequence, and the UNetbootin incompatibility warning. - Proxmox VE downloads (ISO) — current VE 9.2-1 ISO and the published SHA256 checksum.
- Proxmox VE 9.0 release announcement — VE 9 on Debian 13 “Trixie.”
- Proxmox VE FAQ — support lifecycle table — the per-version support windows: VE 8 on Debian 12 “Bookworm,” Debian EOL 2026-07, Proxmox EOL 2026-08.
- Proxmox VE Upgrade from 8 to 9 — the major-version upgrade process and breaking changes, distinct from routine
full-upgrademaintenance.
Already have the hardware on your desk? The Proxmox mini PC setup walkthrough is the hands-on companion to this reference. Still picking parts? See the Proxmox hardware requirements. Running VE 8 today? The 8-to-9 upgrade guide is the planned-upgrade path.
Frequently asked questions
How do I install Proxmox VE?
Is Proxmox VE free to install?
How do I update Proxmox VE?
What is the difference between updating and upgrading Proxmox?
Which filesystem should I pick when installing Proxmox?
Do I have to remove the Proxmox subscription nag screen?
Sources and corrections
- Last updated
- Methodology
- See our methodology for research and review standards.
- Update log
- 2026-08-23 — Re-verified the release claims at the primary source and refreshed a stale as-of date. download.proxmox.com/iso/ still lists no ISO newer than proxmox-ve_9.2-1.iso (retrieved 2026-08-23); a HEAD on that file returns Content-Length 1706178560 bytes (1.7 GB decimal) and Last-Modified Thu, 21 May 2026, so the VE 9.2-1 / 1.7 GB / May 21 2026 claims all still hold. The download section still hedged ‘As of June 2026’, two months behind the page’s own last verification, so it now reads ‘As of August 2026 that is still the VE 9.2-1 installer’. No other figure on the page changed.
- 2026-08-14 — Corrected an expired support-window claim and its citation. The page previously read ‘Proxmox VE 8.4 continues to receive security and bug-fix updates until August 2026, so there is no pressure to rush the jump’ – written in June 2026 as a future deadline, but read on 2026-08-14 that deadline has arrived, and the ’no pressure’ advice inverted into telling readers to sit on a hypervisor at end of life. Proxmox’s official support lifecycle table (pve.proxmox.com/wiki/FAQ, retrieved 2026-08-14) lists Proxmox VE 8 as Debian 12 Bookworm, first release 2023-06, Debian EOL 2026-07, Proxmox EOL 2026-08. Separately, the August 2026 window was cited to the VE 9.0 press release, which contains no support-window, EOL, or lifecycle statement of any kind (verified by full-text retrieval: the page’s only occurrence of ‘2026’ is its copyright footer). The claim is now sourced to the FAQ lifecycle table, which does state it. The VE 9.2-1 / 1.7 GB / May 21 2026 release claims elsewhere on the page were re-verified as still current and left unchanged: download.proxmox.com lists no ISO newer than proxmox-ve_9.2-1.iso, Content-Length 1706178560 bytes, Last-Modified Thu, 21 May 2026.
- Corrections
- Spotted an error or a stale number? Email contact@techfuelhq.com. Confirmed corrections are added to the update log above.