
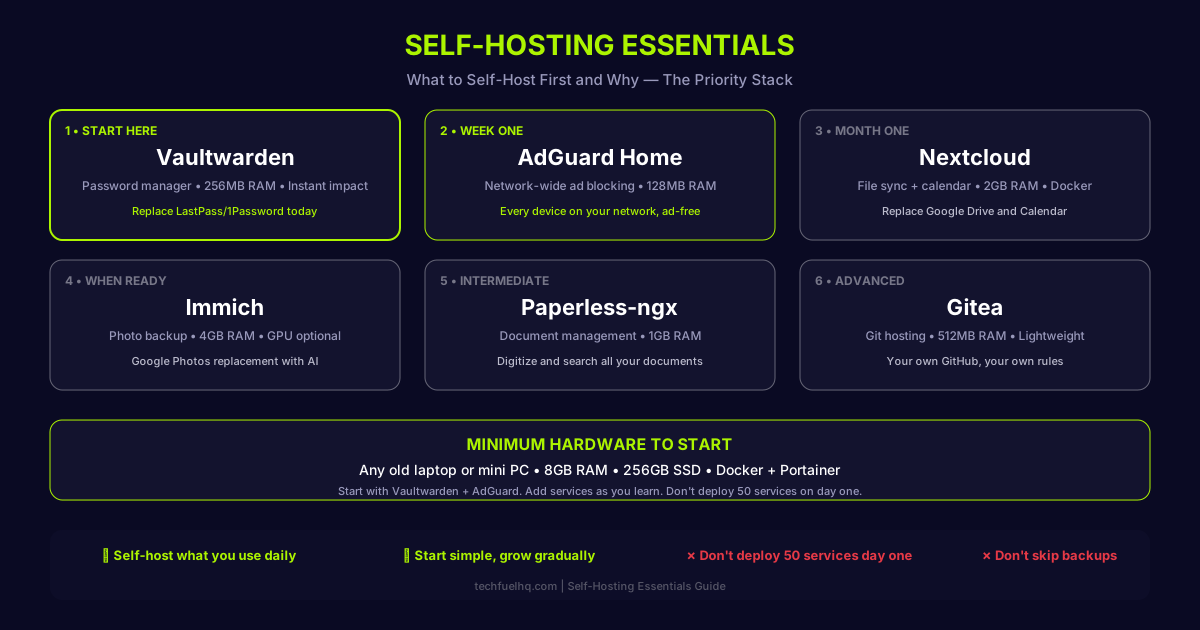
Every self-hosting thread on Reddit reads the same way. Someone asks what they should run first, and the replies are a wall of fifty services — Nextcloud, Immich, Vaultwarden, Paperless-ngx, Gitea, Authentik, a full monitoring stack — as if a person who just learned what Docker is should immediately deploy a production infrastructure platform.
That's bad advice. Most of those services are genuinely useful, but the order matters. Self-host the things that improve your daily life immediately, not the things that sound impressive in a screenshot. Start with what's trivial to run, what you'll actually notice working, and what teaches you the skills to handle the harder stuff later.
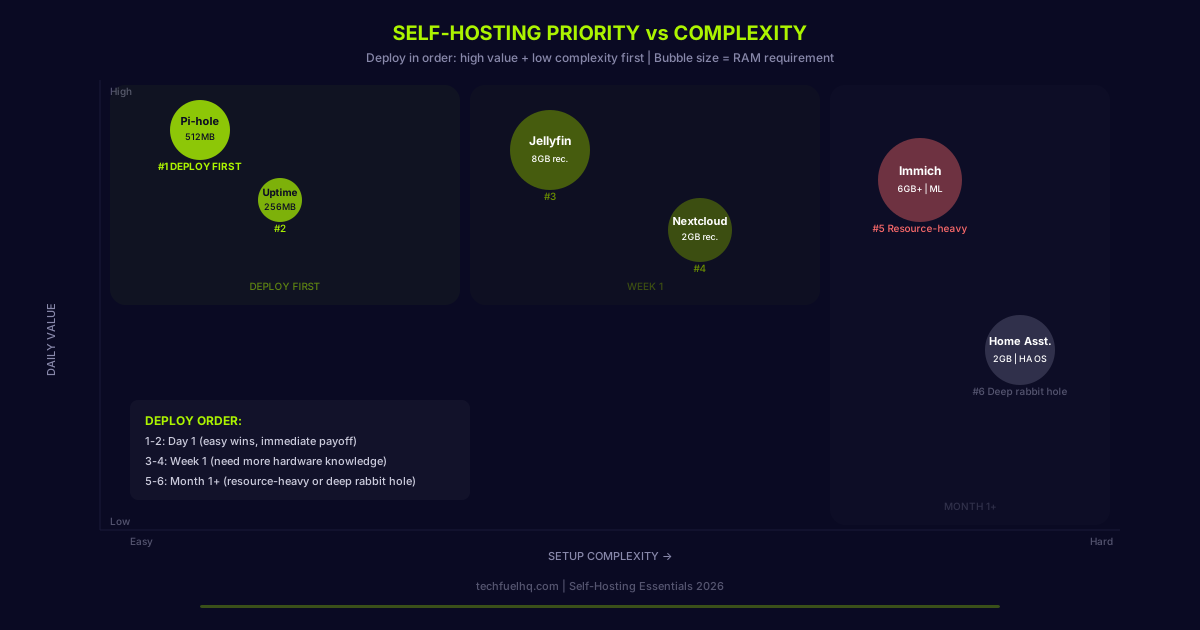
Here are six services in the order you should deploy them, with hardware requirements for each. No fluff, no fifty-service listicle, no services you'll set up once and forget about.
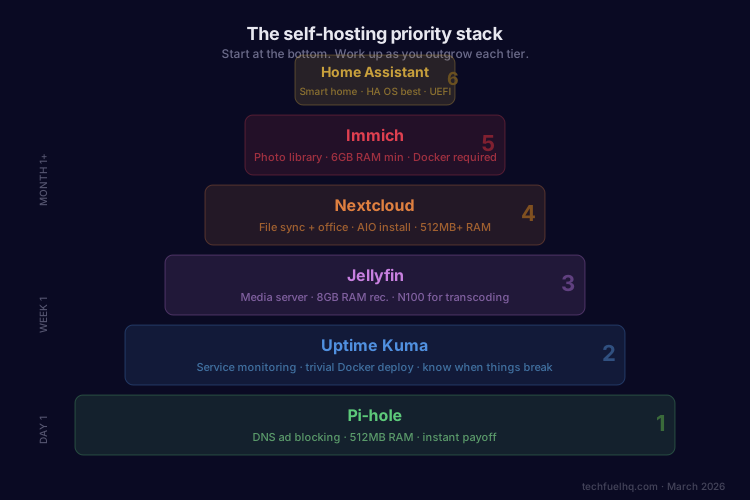
1. Pi-hole — Deploy This First, Period
What it does: DNS-level ad and tracker blocking for your entire network. Every device connected to your home network — phones, laptops, smart TVs, IoT junk — gets ad blocking without installing anything on the device itself.
Why it's first: You notice it working within five minutes. Pages load faster. YouTube pre-roll ads vanish on some devices. Telemetry from your smart TV stops phoning home. The daily quality-of-life improvement is immediate and tangible, which matters when you're investing time learning Docker and self-hosting patterns. Early wins keep you motivated.
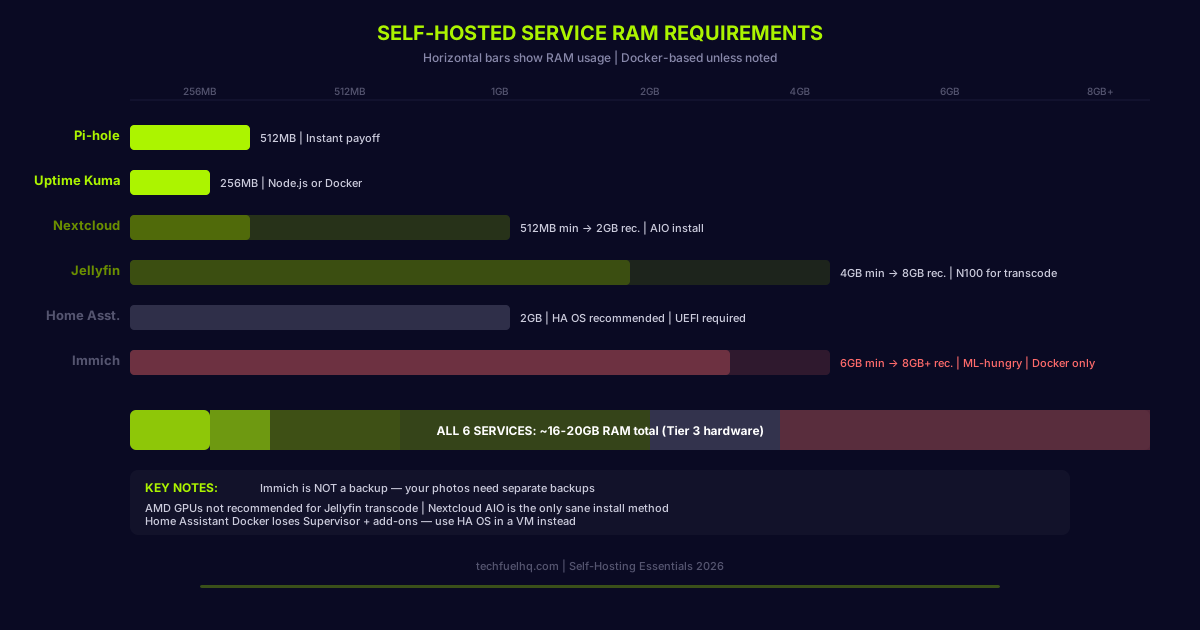
Requirements: 512MB RAM minimum, 2GB storage (4GB recommended). Docker Compose deploy is a single YAML file and takes about three minutes. Point your router's DHCP DNS to the Pi-hole container's IP address, and every device on your network is covered.
Pi-hole runs on literally anything. A Raspberry Pi. An LXC container in Proxmox. A Docker container on your mini PC homelab. If your machine can run Docker, it can run Pi-hole. Picking the host OS itself is a separate decision — the Proxmox vs TrueNAS vs Unraid breakdown covers that.
Pi-hole or AdGuard Home? Worth saying out loud, because this site does not give one answer. The 12 self-hosted apps guide puts AdGuard Home in the DNS slot instead, for DNS-over-HTTPS upstreams and per-client rules in a cleaner UI. That is a real advantage. It is the pick once you know what you want. For the very first service you deploy, either one gets you the same win in the same three minutes. Pi-hole keeps the slot here on footprint and on the volume of beginner documentation. Swap later. Nothing you learn on one is wasted on the other.
2. Uptime Kuma — Know When Things Break
What it does: Monitors your services and alerts you when something goes down. HTTP checks, TCP port checks, DNS resolution, ping — with a clean dashboard and notification integrations for Telegram, Discord, email, and more.
Why it's second: Once you're running Pi-hole, you need to know if it stops working. And as you add more services, Uptime Kuma becomes the single pane of glass that tells you the state of your homelab — and for the hardware side (CPU, RAM, disk, temperature), the lightweight resource monitors Beszel, Netdata, and Glances pair with it. It's the monitoring foundation everything else builds on.
Requirements: Minimal. The Docker image is tiny. If you want to run it without Docker, you need Node.js 20.4 or newer, which is a minor dependency. But Docker Compose is the right path — one container, a few environment variables, done.
The setup time is under ten minutes, and the Uptime Kuma setup guide has the compose file. The payoff is permanent: you'll get a Telegram notification at 2am when your DNS goes down instead of waking up to a household complaining that "the internet is broken."
3. Jellyfin — Your Media, Your Server
What it does: Free, open-source media server. Streams your movies, TV shows, and music to any device. The self-hosted Plex alternative that doesn't require a subscription and doesn't phone home.
Why it's third: Media streaming is the service most households actually use daily. If you have a media library — even a small one — Jellyfin turns your homelab from a nerd project into something your entire household benefits from. That buys you goodwill for the hardware sitting in the closet.
Requirements: This is where hardware starts to matter. 8GB RAM recommended (4GB can work on Linux without a desktop environment). For transcoding — converting media formats on the fly for devices that can't direct-play — you want an Intel N100 or newer with Quick Sync. Intel's hardware transcoding is dramatically better than software transcoding on this class of hardware.
One important warning: AMD GPUs are not recommended for transcoding on non-Apple systems. If your homelab mini PC has AMD integrated graphics, you'll want to ensure your clients can direct-play most formats. Intel Quick Sync is the safe path for transcoding on a budget.
Also: Jellyfin on TrueNAS CORE (FreeBSD) is unsupported. On TrueNAS SCALE (Linux), it works fine. If you're running a NAS build, SCALE is the right choice for Jellyfin.
4. Nextcloud — Replace Google Drive and Calendar
What it does: File sync, calendar, contacts, document editing, and about two hundred other things you'll never use. Think of it as self-hosted Google Workspace — files across all your devices, collaborative document editing, and calendar sync, all under your control.
Why it's fourth: Nextcloud is extremely useful but meaningfully harder to maintain than the first three services. Updates can break plugins. Performance tuning requires database knowledge. The file sync client occasionally does something unexpected. It's not hard, but it's more work than Pi-hole, and you want the Docker fundamentals solid before you take it on.
Requirements: 64-bit CPU, 64-bit OS, 64-bit PHP. 128MB RAM minimum per PHP process, 512MB recommended. In practice, allocate 1–2GB to the Nextcloud stack (app + database + Redis cache) for comfortable performance.
The official install method is Nextcloud AIO (All-in-One), which is a single Docker container that manages the full stack including the database, Redis, and an integrated backup solution. Use AIO. Don't manually compose a Nextcloud stack unless you enjoy debugging PHP-FPM configurations at midnight.
5. Immich — Google Photos Without Google
What it does: Photo and video backup with AI-powered face recognition, location mapping, timeline browsing, and a mobile app that auto-uploads from your phone. The self-hosted Google Photos replacement the community has been waiting for.
Why it's fifth: Immich is genuinely impressive software. It's also resource-hungry and under active development with breaking changes between versions. The machine learning features — face detection, object recognition, smart search — need real CPU or GPU resources. This is not a service for your first week of self-hosting.
Requirements: 6GB RAM minimum, 2 CPU cores, Docker required (no bare-metal option). The ML inference runs on CPU by default and will consume meaningful resources during photo processing. On an N100 mini PC, initial library processing will be slow but manageable. On a Ryzen 5825U or better, it's comfortable.
One critical detail the marketing doesn't emphasize: Immich is not a backup solution. Your photos in Immich still need a separate backup. If the Immich database corrupts or the host disk fails, your photos are gone unless you have independent backups of the underlying storage. Treat Immich as a viewing and organization layer, not your only copy.
6. Home Assistant — The Smart Home Brain
What it does: Connects and automates every smart device in your home — lights, thermostats, cameras, sensors, locks — regardless of brand or protocol. Zigbee, Z-Wave, Matter, Wi-Fi, Bluetooth — Home Assistant talks to all of them.
Why it's last: Not because it's bad — it's exceptional. But Home Assistant is a deep rabbit hole. The automation engine is powerful enough to consume weeks of tinkering. The device ecosystem requires research specific to your hardware. And the recommended installation method is its own operating system, which means either a dedicated box or a dedicated VM.
Requirements: x86-64 hardware, UEFI enabled, Secure Boot disabled. The recommended path is Home Assistant OS — a purpose-built Linux distro that manages updates, add-ons, and backups through the HA interface. Running HA as a Docker container is possible but you lose the Supervisor and the add-on ecosystem, which is most of what makes HA approachable.
For a Proxmox setup, run HA OS as a dedicated VM. Allocate 2GB RAM, 2 vCPUs, and 32GB of disk. Pass through a USB Zigbee/Z-Wave coordinator if you're using one. This is the cleanest path that preserves the full HA experience inside a hypervisor.
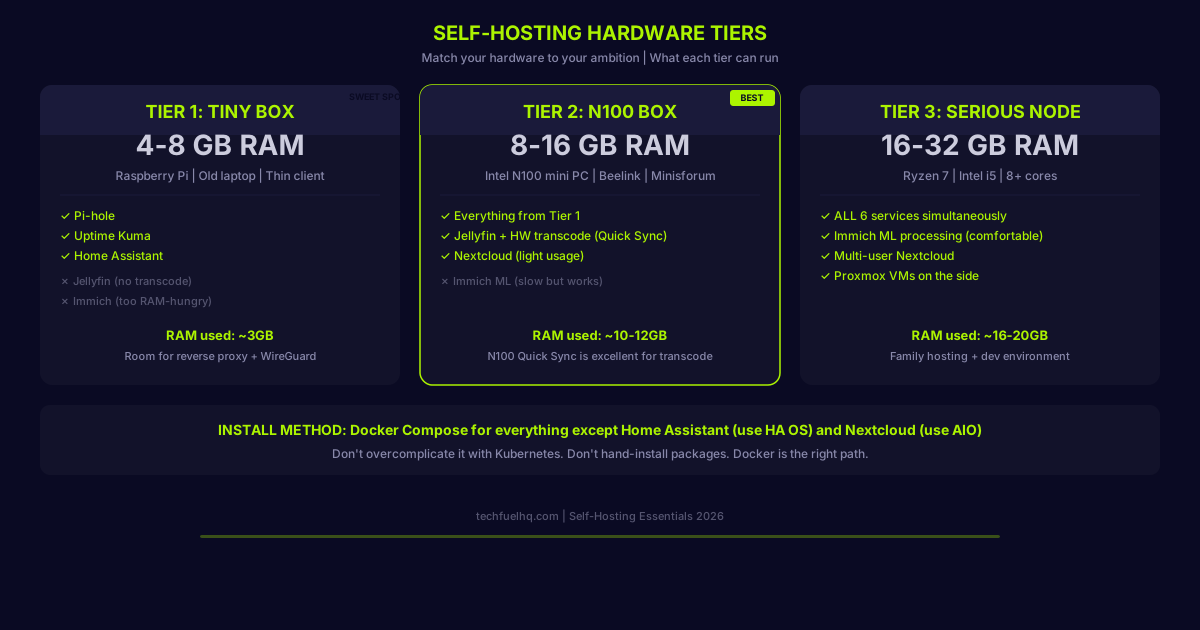
Hardware Tiers — Match Your Box to Your Ambition
You don't need to buy new hardware to start self-hosting. But knowing what your current hardware can handle — and where the ceiling is — saves you from deploying something that grinds your box to a halt.
Tier 1: The Tiny Box (4–8GB RAM)
A Raspberry Pi 4, an old laptop, a thin client from eBay. Anything with 4–8GB of RAM and an x86 or ARM64 processor. This comfortably runs Pi-hole + Uptime Kuma + Home Assistant — the three lightest services on the list. Total RAM footprint is under 3GB. You have room for a few more lightweight containers (a reverse proxy, maybe WireGuard VPN) before you hit the ceiling.
Don't try to run Jellyfin with transcoding or Immich on this tier. You'll have a bad time.
Tier 2: The N100 Box (8–16GB RAM)
Anything from a budget Intel N100 box (Beelink S12 Pro class) up to a beefier Minisforum MS-01 (Intel Core H-class) or Ryzen-based Beelink SER8, with 16GB of DDR5. This is the sweet spot for most self-hosters. Everything from Tier 1 plus Jellyfin with hardware transcoding (Intel Quick Sync, even on the little N100, is excellent) and a light Nextcloud instance for file sync and calendar.
At 16GB you have enough headroom for the Docker stacks, the databases, and some breathing room for ZFS ARC if you're running Proxmox with ZFS. The N100's four cores will occasionally bottleneck during heavy concurrent workloads, but for a household of 2–4 people, it's plenty.
Tier 3: The Serious Node (16–32GB RAM)
A Ryzen 7 or Intel i5-based mini PC — the AOOSTAR WTR Pro 5825U, Minisforum MS-A2, or equivalent. Eight or more cores, 32GB+ of RAM. This runs everything on the list simultaneously: all six services plus Immich's ML processing, Jellyfin transcoding, a Nextcloud instance handling multiple simultaneous users, and a Proxmox VM or two on the side.
If you're planning to host for a family, run photo backups for multiple people through Immich, or use your homelab as a development environment alongside self-hosted services, this is the tier to aim for. The 5825U's 8 cores and 16 threads handle concurrent workloads that would choke an N100.
Self-hosting is for you if:
- You want to learn real infrastructure skills — Docker, networking, storage, Linux — by running actual services
- You have hardware sitting around that could be doing something useful
- You're tired of paying monthly subscriptions for services you could run yourself
- You care about data privacy and want your files, photos, and DNS queries under your control
- You're willing to spend a weekend setting things up and an hour a month maintaining them
Self-hosting is not for you if:
- You want zero maintenance — cloud services handle updates, backups, and uptime for you
- You need guaranteed availability — a homelab goes down when your power or internet does
- Your time is worth more than the subscription costs — if $10/month for Google One saves you hours of Nextcloud maintenance, that's a valid choice
The Verdict
Start with Pi-hole. You'll notice the difference before you finish reading this sentence. Add Uptime Kuma so you know when things break. Then Jellyfin if you have media, Nextcloud if you want to leave Google Drive, Immich when you're ready for the RAM commitment, and Home Assistant when you're ready for the rabbit hole.
The order matters because each service teaches you something the next one needs. Pi-hole teaches you Docker and DNS. Uptime Kuma teaches you monitoring. Jellyfin teaches you hardware transcoding and storage. Nextcloud teaches you database management. Immich teaches you resource planning. Home Assistant teaches you device integration and automation.
By the time you're running all six, you've built something genuinely useful — a home infrastructure that blocks ads, streams media, syncs files, backs up photos, automates your house, and tells you when any of it needs attention. That's not a lab project. That's a system. Build it in the right order and it'll actually stick.
What does it actually cost vs SaaS?
The answer has two sides. Self-hosting trades subscription fees for capital and electricity: the host draws power 24/7 (idle wattage is the number that matters — the 24/7 idle power cost breakdown works through it per device), drives wear out and get replaced, and your time is the labor line SaaS quietly includes. SaaS trades a predictable fee for per-seat pricing that scales against you as accounts and storage grow.
The Self-Hosting Break-Even Calculator answers this with your real numbers — add what you’re currently paying for Google One, Plex Pass, 1Password, or Dropbox, set your hardware budget, and see when self-hosting pays for itself.
Next step: install everything
Five of the six have an install guide on this site: Uptime Kuma, Jellyfin, Nextcloud AIO, Immich and Home Assistant on Proxmox. For Tailscale remote access (so you can reach everything without exposing ports), see the Tailscale homelab guide.
To size a host for the services above, the PC Builder runs real socket, RAM, and PSU clearance checks.
Sources and methodology
This is an opinionated ordering of self-hosted services based on the maintainer docs and published community deployment patterns as of 2026-06-10.
Primary sources cited:
- Pi-hole docs — official documentation
- AdGuard Home — project documentation
- Uptime Kuma — project documentation
- Jellyfin docs and Nextcloud docs — official references
- Immich docs — official documentation
- Home Assistant docs — official OS installation guide
- Awesome-Selfhosted curated list — community curated index
Email corrections to contact@techfuelhq.com.
Frequently asked questions
What should you self-host first?
What hardware do you need to start self-hosting?
How much RAM do you need to self-host?
Do you need Docker to self-host?
Is self-hosting worth it?
Can you self-host on a Raspberry Pi or an old laptop?
Sources and corrections
- Last updated
- Methodology
- See our methodology for research and review standards.
- Update log
- 2026-09-28 — Page updated.
- Corrections
- Spotted an error or a stale number? Email contact@techfuelhq.com. Confirmed corrections are added to the update log above.