 TechFuel HQ
By LK Wood IV · Published 2026-06-19 · St. Louis County, MO · ~13 min read
TL;DR · Old PC into a NAS
- Does it qualify? 64-bit CPU, 4GB+ RAM (8GB comfortable), enough SATA ports for your drives plus a boot SSD, and bay space. Almost any desktop from the last ~10 years passes.
- Pick the OS by RAM: low-RAM or genuinely old box gets OpenMediaVault (Debian, runs on 2-4GB). 8GB+ and you want checksumming gets TrueNAS Community Edition (ZFS). Want to mix drive sizes and will pay gets Unraid.
- Boot device: a small separate SSD (64-128GB). Never install the OS on a data drive.
- Out of SATA ports? Add an LSI HBA flashed to IT mode, not a cheap RAID card or port multiplier.
- The catch: no ECC on consumer boards (fine, keep backups), and an old tower can idle at 40-70W versus under 20W for a purpose-built box. If power matters, do the three-year math first.
- This guide is the zero-purchase path. Buying new parts instead? See the budget NAS build guide. Want a hypervisor, not just storage? See the old gaming PC to Proxmox guide.
The real question: is your old PC worth it versus a $200 mini PC?
You have a desktop in a closet. An old office Optiplex, a retired family PC, a gaming rig you upgraded out of. The pitch is obvious: it already has a case, a power supply, RAM, and probably some empty drive bays, so turning it into network storage costs nothing but a weekend. That is true, and it is the single best reason to do this.
But “free” only counts the up-front cost. A network-attached storage box runs around the clock, so the number that actually matters over its life is idle power draw. A 2018-era tower with a 65W-class CPU and a couple of spinning drives commonly idles somewhere in the 40-70W range, while a purpose-built 4-bay mini NAS like the ones in the budget NAS build guide idles under 20W. At a typical US electricity rate, that gap is real money over three years. We track the actual draws for common homelab hardware in the 24/7 idle power cost breakdown so you can plug in your own rate.
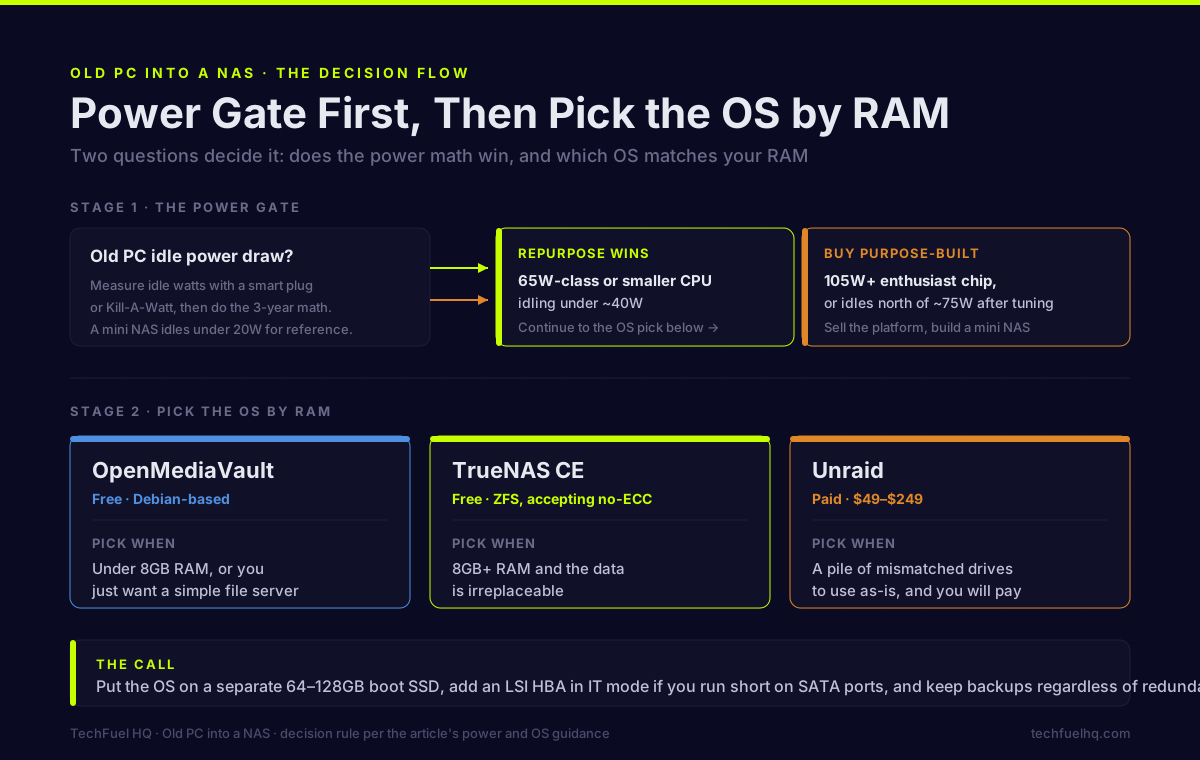
Here is the decision rule. If the old PC has a 65W-class or smaller CPU and you can get it idling under ~40W, repurposing it is the clear winner — you save the entire cost of a new box and you get a far bigger RAM ceiling and more PCIe slots than any mini PC. If it is a 105W+ enthusiast chip, or it idles north of ~75W even after tuning, the power bill will quietly out-cost a new mini NAS inside a year or two. In that case, sell the old platform and buy purpose-built.
This guide is specifically the reuse the hardware you already own path. If your goal is a virtualization host that also does storage rather than a dedicated storage appliance, you want the old gaming PC to Proxmox guide instead — same hardware, different job. And if you are still deciding whether you even need a NAS versus simpler direct-attached storage, start with DAS vs NAS in 2026.
Does my old PC qualify? The five-minute checklist
Before you download anything, confirm the machine clears these bars. None of this requires opening a terminal yet, just knowing your specs.
1. 64-bit CPU
Every NAS OS worth running is 64-bit only. Any Intel Core 2-era-or-newer or AMD chip from roughly 2010 onward is 64-bit, so this rules out only genuinely ancient hardware. Practically, if the PC ran a 64-bit copy of Windows, it qualifies. Unlike a Proxmox hypervisor build, you do not need VT-x/VT-d virtualization flags for a plain NAS, so even chips with virtualization disabled or absent are fine.
2. RAM: 4GB floor, 8GB comfortable
This is the spec that steers your OS choice more than any other. The Google AI Overview and the r/HomeServer consensus both land on the same numbers: 4GB is the absolute minimum, 8GB or more is recommended for stability. OpenMediaVault will genuinely run on 2-4GB because it is just Debian with a web UI. TrueNAS wants 8GB as a practical floor because ZFS uses spare RAM as read cache. Whatever you have, there is an OS that fits it — the trick is matching them, which the next section does.
3. SATA ports (and bay space)
Count two things: how many SATA ports the motherboard has, and how many drives the case can physically hold. You need one SATA port per data drive plus one for the boot device. Most consumer boards ship 4-6 ports, which comfortably covers a 2-4 drive home NAS. Bay space is the other half: a slim office desktop might only fit one or two 3.5-inch drives even if the board has six ports, so check the chassis, not just the spec sheet. XDA’s “things to check when building a NAS with old PC parts” walks through exactly this trap.
4. The HBA escape hatch (when you run out of ports)
If you want more drives than the board has ports, the community-standard answer is an LSI HBA card flashed to “IT mode.” IT mode turns the card into a plain pass-through controller, handing each disk directly to the OS — which is exactly what ZFS and OMV want. Cards like the LSI 9211-8i (and its OEM rebadges from Dell and others) are cheap on the used market and are a homelab staple precisely for this. Avoid two tempting shortcuts: a cheap hardware RAID card (it hides the disks from ZFS) and a SATA port multiplier (flaky under load). The flashing process is well-documented across the TrueNAS forums and r/homelab; budget an evening for it the first time.
5. A separate boot drive
Do not install the NAS OS onto one of your storage drives. Use a small, dedicated boot device — a cheap 64-128GB SATA or NVMe SSD is ideal. If you are genuinely out of SATA ports, a quality USB SSD works (the official TrueNAS forum advice is a real USB SSD like a Samsung T7, not a flimsy thumb drive, which wears out fast). Keeping the OS off the data pool means the storage stays clean and portable: you can reinstall or swap the OS without ever touching your files.
| Check | You need | Fix if short |
|---|---|---|
| CPU | 64-bit (any ~2010+ desktop) | None practical — replace the box |
| RAM | 4GB min / 8GB comfortable | Cheap DDR3/DDR4 used, or run OMV |
| SATA ports | 1 per drive + 1 boot | LSI HBA in IT mode |
| Bay space | Room for your 3.5in drives | Bigger case, or fewer/larger drives |
| Boot device | Separate 64-128GB SSD | USB SSD (not a thumb drive) |
Choosing the OS: OpenMediaVault vs TrueNAS vs Unraid
This is where people stall, and the wrong pick means a rebuild. For an old consumer PC specifically, the decision is simpler than the general “best NAS OS” debate, because two things narrow it: your RAM, and the fact that your board almost certainly has no ECC.
OpenMediaVault — the default for old, low-RAM hardware
OpenMediaVault (OMV) is Debian Linux with a NAS-focused web UI bolted on. That is its whole strength: it is the lightest option by a wide margin, runs comfortably on 2-4GB of RAM, and does not force a particular filesystem on you (ext4, XFS, or Btrfs, with ZFS available via plugin). It does SMB/CIFS shares, NFS, rsync, and basic Docker, and nothing it does not need to. For a genuinely old desktop, a low-RAM machine, or anyone who wants a pure file server without ZFS’s appetite, OMV is the right call and the one the SERP’s own AI Overview singles out as “designed specifically to run well on minimal, older hardware.”
TrueNAS Community Edition — when you have 8GB+ and want ZFS
TrueNAS Community Edition is built around ZFS, and that is both its appeal and its cost. ZFS gives you end-to-end checksumming, silent scrubs that catch bit rot, snapshots, and clean recovery from a failed drive — the most trustworthy storage layer you can run on consumer hardware. The price is RAM: TrueNAS lists 8GB as its practical floor, and ZFS will use whatever spare memory you give it as read cache (ARC). The widely repeated “1GB of RAM per TB” rule is a rough rule of thumb, not a requirement, and has been walked back for years. If your old PC has 8GB or more and the data matters, TrueNAS is the pick. Just go in knowing the ECC caveat below.
Unraid — the paid pick for mismatched drives
Unraid is the odd one out: it is paid (perpetual licenses from roughly $49 to $249), and instead of pooling identical disks it treats each drive as its own filesystem with parity calculated across them. The killer feature is mixing drive sizes — exactly the situation you land in when you reuse an old PC and a junk-drawer pile of mismatched HDDs (a 4TB, a 6TB, an 8TB all in one array). It also has the friendliest Docker and VM interface of the three. The tradeoffs: it costs money, and its parity approach does not checksum data the way ZFS does. If you are reusing whatever drives you already own and do not want to buy a matched set, Unraid’s flexibility is worth the license. If you do go the other way and buy a matched set of NAS drives for a ZFS pool, the best NAS hard drives guide walks through the CMR picks and the recertified $/TB math — and if you’re set on Seagate, IronWolf vs IronWolf Pro vs Exos sorts out which of the three tiers fits your pool and budget.
The decision rule
- Under 8GB RAM, or you just want a simple file server: OpenMediaVault.
- 8GB+ and the data is irreplaceable: TrueNAS Community Edition (ZFS), accepting no-ECC.
- A pile of mismatched drives you want to use as-is, and you will pay: Unraid.
For a deeper look at how the ZFS, Btrfs, and parity backends actually differ on rebuilds, IOPS, and redundancy, see the full Proxmox vs TrueNAS vs Unraid storage backend comparison. And before you commit to a drive layout, run your disk count and sizes through the NAS and RAID storage calculator to see usable-versus-raw capacity across RAID and RAIDZ levels.
| OpenMediaVault | TrueNAS CE | Unraid | |
|---|---|---|---|
| Price | Free | Free | $49-$249 |
| Min RAM | 2-4GB | 8GB | 4GB (8GB+ ideal) |
| Filesystem | ext4 / XFS / Btrfs | ZFS | XFS + parity |
| Bit-rot protection | Depends on FS | Yes (self-heal) | Parity only |
| Mix drive sizes | With plugin | No | Yes (killer feature) |
| Best for old PC when | Low RAM, simple file server | 8GB+, data integrity | Mismatched junk-drawer drives |
The build path: from old PC to working shares
Once the machine qualifies and you have picked an OS, the actual conversion is short. This is the path the TrueNAS docs, OMV docs, and every beginner walkthrough converge on.
Step 1 — Back up anything on the drives first
Installing a NAS OS and creating a storage pool erases the drives. If the old PC or any of the disks still hold files you care about, copy them off now, to another machine or an external drive. There is no undo once you build the pool.
Step 2 — Pick your OS and download the installer
Grab the ISO for your choice: OpenMediaVault from the official site, TrueNAS Community Edition from truenas.com, or Unraid from unraid.net. Match it to your RAM per the decision rule above — this is the call that is hardest to reverse later.
Step 3 — Flash a USB installer
Write the ISO to a spare USB stick with Rufus (Windows), balenaEtcher (cross-platform), or Ventoy if you want to keep several installers on one stick. This USB is the installer and can be reused afterward — it is not where the OS will live.
Step 4 — Boot the old PC from USB and install
Plug in the installer USB and your separate boot SSD. Power on and tap the boot-menu key (commonly F11, F12, or Delete) to boot from the USB. Run the installer and, when it asks for a target, select your small boot SSD — not a data drive. A few minutes later it reboots to a console showing an IP address, for example 192.168.1.150.
Step 5 — Open the web UI and set a static IP
Type that IP into a browser on your main computer to reach the NAS dashboard. First housekeeping job: give the NAS a static IP, either in the OS network settings or as a DHCP reservation in your router, so the address never moves out from under you.
Step 6 — Create the storage pool
In the OS dashboard, group your data drives into a pool. The redundancy choice matters: a two-drive mirror (ZFS mirror or RAID 1) gives you one-drive fault tolerance and is the simplest safe default; larger arrays use RAIDZ (TrueNAS) or parity (Unraid). Sanity-check raw-versus-usable space for your layout with the NAS and RAID storage calculator before you commit, since redundancy always costs capacity.
Step 7 — Create shares and connect
Enable SMB (Server Message Block) for Windows/Mac/Linux access, create a shared folder on your pool, add a user, and point your other devices at it. The share now mounts like any network drive. Add a scheduled scrub (ZFS) or parity check (Unraid) so the array verifies itself on a cadence, and you have a working NAS.
The caveats
A repurposed old PC is a genuinely good NAS, but it is not free of tradeoffs, and pretending otherwise would not help you. Here are the four worth knowing before you commit.
Power draw. This is the big one, covered up top: an old tower idles far higher than a purpose-built mini NAS, and over years that gap can exceed the cost of just buying the new box. Measure your idle wattage with a smart plug or a Kill-A-Watt and run it against your electricity rate using the 24/7 idle power cost breakdown. If you are over ~75W and cannot bring it down, the repurpose math may not win.
No ECC RAM. Consumer desktop boards do not support error-correcting memory, and ZFS is happiest with ECC. But the long-standing scare that “ZFS without ECC will destroy your data” has been overstated for years — non-ECC ZFS is no more dangerous than any other non-ECC filesystem, and it is what the overwhelming majority of home TrueNAS users run. The real protection is not ECC; it is keeping actual backups, because a NAS (RAID or not) is never a backup by itself.
Drive and SATA limits. A consumer board and a small case cap how far you can expand. You can push past the port count with an HBA, but bay space, power-supply SATA connectors, and airflow all become real constraints as you add disks. If you find yourself buying an HBA, a bigger PSU, and a new case, you have effectively built a new machine and should price it against a purpose-built one.
Noise and footprint. A tower with case and CPU fans is louder and far larger than a silent shelf-top mini NAS. If the box lives in an office or bedroom, that matters. It is a fine reason to choose differently even when the power math says “keep it.”
None of these are dealbreakers for the common case — a reasonably efficient desktop with a few drives, living somewhere you will not hear it. They are the signals that tell you when reusing the old PC stops making sense and buying purpose-built starts. If you land on “buy,” the budget NAS build guide covers the cheapest paths in the current drive-price climate.
Bottom line
If you already own a desktop with a 64-bit CPU, 4GB or more of RAM, and a couple of free SATA ports, you can turn it into a real NAS this weekend for the cost of a small boot SSD and a free OS. Match the OS to the RAM — OpenMediaVault for the lean, low-RAM box; TrueNAS Community Edition when you have 8GB-plus and want ZFS’s data integrity; Unraid when you are pooling mismatched drives and will pay for the convenience. Put the OS on a separate boot drive, add an LSI HBA in IT mode if you run short on ports, and keep backups regardless of redundancy.
The one number that decides whether this is a smart move or a slow money leak is idle power. Measure it, do the three-year math, and if your old tower drinks too much, there is no shame in selling it and building a purpose-built box instead. For most people with a 65W-class machine gathering dust, though, the answer is simple: do not throw it out — give it a second life as storage.
Sources
- XDA — How to turn an old PC into a NAS and 6 things to check when building a NAS with old PC parts — hardware checklist, SATA/bay constraints, boot-drive guidance
- How-To Geek — Don’t throw away your old PC, it makes a better NAS — boot SSD, RAM, Rufus-flashed TrueNAS USB walkthrough
- TrueNAS documentation and community forums — Community Edition system requirements, ZFS RAM guidance, USB-SSD boot advice, no-ECC reality
- OpenMediaVault documentation — Debian base and minimal-hardware system requirements
- Unraid documentation — licensing tiers and mixed-drive parity array
- r/HomeServer — “Complete beginner: can I build a NAS with an old PC” and r/DataHoarder — “Use an old PC, or build a NAS?” — community consensus on RAM floor, OS choice, and the HBA IT-mode staple
- Rufus and balenaEtcher — USB installer tools
Email corrections to contact@techfuelhq.com.
Lowell K. Wood IV (LK Wood IV) runs TechFuel HQ from St. Louis County, Missouri — a homelab and budget-PC infrastructure site for self-hosters who refuse to pay cloud rent. Contact: contact@techfuelhq.com
Frequently asked questions
Can I use an old PC as a NAS?
Is it cheaper to build a NAS from an old PC?
Is 16GB of RAM enough for a NAS?
How much RAM does a NAS need?
What is the best NAS software for an old PC?
Do I need ECC RAM to run TrueNAS on an old PC?
How many SATA ports do I need, and what if I run out?
Should I run the OS on one of my storage drives?
Sources and corrections
- Last updated
- Methodology
- See our methodology for research and review standards.
- Update log
- 2026-09-15 — Page updated.
- Corrections
- Spotted an error or a stale number? Email contact@techfuelhq.com. Confirmed corrections are added to the update log above.