 TechFuel HQ
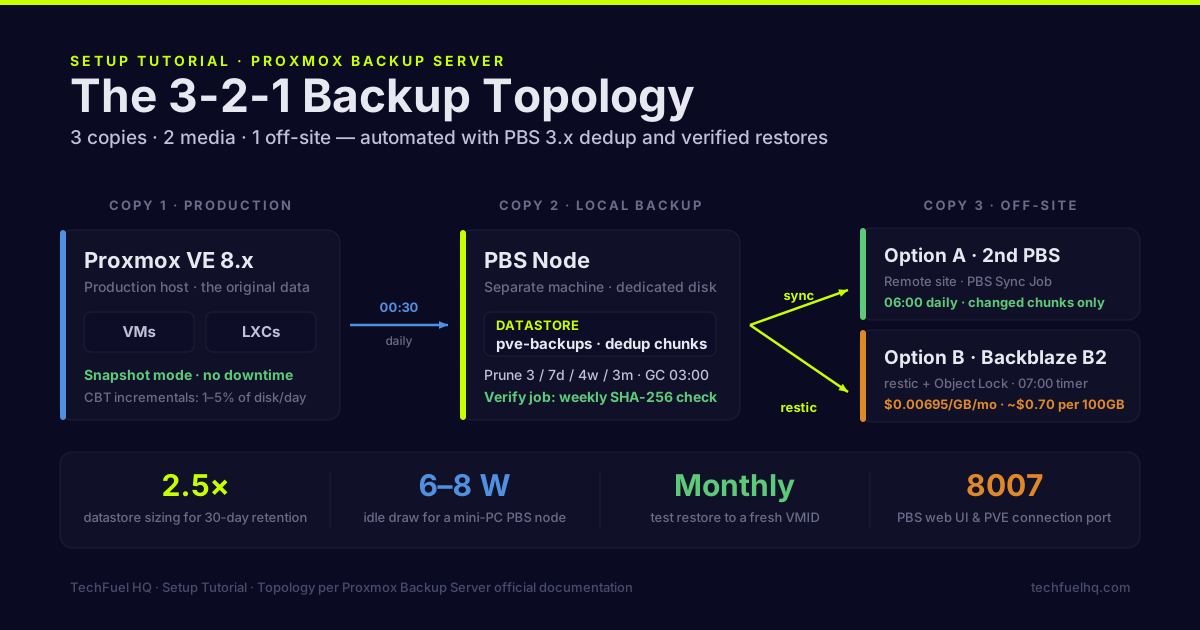
Three copies, two media, one off-site: PBS supplies copies two and three. Copy one is the guest on Proxmox VE. Copy two is a pve-backups datastore on a separate PBS box, fed by a 00:30 daily job over port 8007 and pruned 3/7d/4w/3m. Copy three is a 06:00 sync to remote PBS, or restic to Backblaze B2. Restore-test monthly.
By LK Wood IV · 2026-06-01 · ~15 min read · St. Louis County, MO
Most homelab Proxmox setups have no real backup strategy. They rely on ZFS snapshots (local-only, same hardware), maybe Clonezilla images that haven’t been tested, or a mental note to “set up backups eventually.” Eventually usually means the day a drive fails.
This guide walks through setting up Proxmox Backup Server (PBS) to cover the 3-2-1 rule: 3 copies of data, on 2 different media, with 1 copy off-site. By the end you’ll have automated daily backups, verified restores, and an off-site sync. All free, all running in your homelab. This is the Proxmox implementation of the rule; for the platform-agnostic version — including why RAID and a same-pool snapshot are not backups — see the 3-2-1 backup rule for homelabs.
What the 3-2-1 rule means in practice
3 copies — the production data (on your Proxmox host), a local PBS backup, and an off-site copy.
2 different media — your main host storage and the PBS datastore on separate disks or separate machines. Storing PBS on the same physical disk as your VMs is not 2-media.
1 off-site — a copy that survives your house burning down. For homelabs this is typically: a second PBS instance at a friend’s or family member’s house synced via PBS sync jobs, or a cloud backup using restic to Backblaze B2.
This guide builds copies 2 (local PBS) and 3 (off-site sync) assuming copy 1 (production) already exists on your Proxmox host.
Prerequisites
- Proxmox VE 8.x running with at least one VM or LXC container to protect
- A separate machine (or a VM on a separate host) to run PBS — bare metal is ideal
- For off-site: a second PBS node at a remote location, or a Backblaze B2 bucket
If you want to run PBS as a VM on your single Proxmox host to start, that works — you get deduplication and scheduling — but it is not a true 3-2-1 until you add the off-site piece.
Step 1: Install Proxmox Backup Server
Download PBS. Get the ISO from proxmox.com/en/downloads/proxmox-backup-server. As of 2026 the current release is PBS 3.x.
Install on bare metal or VM. The PBS installer is similar to PVE’s — choose a target disk, set hostname (I use pbs01.lan), IP address, and root password. Use a static IP on your LAN for PBS since PVE will connect to it by IP or hostname.
If installing PBS as a VM on PVE, allocate at least 2 vCPUs, 2GB RAM, and pass through or assign a dedicated disk for the backup datastore. Do not use the same physical disk your VMs live on.
Step 2: Configure a datastore
A PBS datastore is a directory that holds chunked backup data. Log into the PBS web UI at https://pbs-ip:8007.
- Go to Datastore → Create Datastore
- Set Name (e.g.,
pve-backups) - Set Backing Path — this should point to your backup disk. For a dedicated drive mounted at
/mnt/backup-drive, set the path to/mnt/backup-drive/pve-backups - Leave Chunk Order at default (inode)
- Click Create
Configure garbage collection. Go to the datastore → GC settings. Enable it on a schedule — daily at 3am works. GC removes chunks that are no longer referenced by any backup snapshot.
Configure prune settings. Under the datastore’s Options, set prune defaults:
Keep Last:    3
Keep Daily:   7
Keep Weekly:  4
Keep Monthly: 3
This keeps 3 most-recent backups, the last 7 daily, 4 weekly, and 3 monthly. Adjust to your storage capacity.
Step 3: Add PBS to Proxmox VE
In PVE’s web UI:
- Datacenter → Storage → Add → Proxmox Backup Server
- Set ID (e.g.,
pbs01) - Set Server to the PBS IP or hostname
- Set Username to
root@pam(or create a dedicated PBS user — preferred for production) - Set Password and the Datastore name you created
- Click Add
PVE will connect to PBS and verify credentials. If this fails, check that port 8007 is reachable between PVE and PBS and that the PBS firewall allows the connection.
Better: create a dedicated PBS user. In PBS web UI:
Administration → Access Control → Add User
Username: pve-backup@pbs
Password: (strong password)
Then assign the DatastoreBackup role to this user on the specific datastore:
Administration → Access Control → Permissions → Add
Path: /datastore/pve-backups
User: pve-backup@pbs
Role: DatastoreBackup
Use pve-backup@pbs as the username when adding PBS to PVE instead of root@pam. This limits what the PVE connection can do on your PBS server.
Step 4: Schedule automated backups
In PVE:
- Datacenter → Backup → Add
- Set Storage to your PBS storage entry (
pbs01) - Set Schedule —
00:30daily is a good default (after midnight, before your morning activity) - Set Mode —
Snapshotfor VMs (live, no downtime),SuspendorStopfor LXC - Under Selection, choose which VMs/LXCs to back up — I recommend selecting all and excluding specific ones you don’t care about
- Enable Send email notification and enter your email
For LXC containers, Snapshot mode requires the underlying storage to support snapshots (ZFS or LVM-thin). If you’re using a directory-backed storage, use Suspend mode instead.
Per-VM backup settings. On individual VMs/LXCs, you can override retention under the Backup tab. This lets high-value VMs keep 30 days of dailies while less critical containers keep only 7.
Step 5: Verify a restore
A backup you haven’t tested is not a backup. After your first scheduled backup runs:
- In PVE, go to the VM or LXC → Backup tab
- Select the most recent backup entry
- Click Restore → set a new VMID (not the same one — you don’t want to overwrite production)
- Boot the restored VM and verify it starts and the data is intact
- Delete the test VM
Do this monthly. Seriously. Backup software has bugs, datastores corrupt, configurations drift. A monthly manual restore is the only way to know your backups are actually usable — and the same restore path is how you move a guest to new hardware without building a cluster.
# Or test from the PBS CLI — list backups:
proxmox-backup-client list --repository root@pam@pbs-ip:8007:pve-backups

# Restore a VM disk to a local path for inspection:
proxmox-backup-client restore vm/100/2026-04-29T00:30:00Z \
  drive-scsi0.img:drive-scsi0.img \
  --repository root@pam@pbs-ip:8007:pve-backups
Step 6: Off-site sync (completing 3-2-1)
Option A: Second PBS node at a remote location
If you have a second PBS instance running at a trusted location (family member’s house, colocated mini PC, etc.):
- In PBS web UI → Remotes → Add Remote
- Enter the remote PBS IP/hostname, port (8007), and credentials
- Go to Datastore → pve-backups → Sync Jobs → Add
- Set Remote to the remote you just added, Remote Store to the remote datastore
- Set Schedule —
06:00daily works (a few hours after local backups complete) - Set Delete Vanished if you want the remote to mirror exactly (remove backups that no longer exist locally)
PBS sync is bandwidth-efficient — only changed chunks transfer. After the initial full sync, daily incrementals for a typical homelab are a few hundred MB.
Option B: Backblaze B2 with restic
If you don’t have a second site, Backblaze B2 gives you off-site object storage at $0.00695/GB/month ($6.95/TB). For 100GB of compressed, deduplicated backup data, that’s about $0.70/month.
Install restic on PBS or on a separate backup machine:
apt install restic

# Initialize the B2 repository
export B2_ACCOUNT_ID=your-account-id
export B2_ACCOUNT_KEY=your-application-key
restic -r b2:your-bucket-name:pve-backups init

# Back up the PBS datastore directory
restic -r b2:your-bucket-name:pve-backups backup /mnt/backup-drive/pve-backups \
  --exclude "*.tmp"
Set this up as a systemd timer that runs after PBS’s garbage collection:
# /etc/systemd/system/restic-b2.service
[Unit]
Description=Restic backup to Backblaze B2
After=network-online.target

[Service]
Type=oneshot
EnvironmentFile=/etc/restic/b2.env
ExecStart=/usr/bin/restic -r b2:your-bucket:pve-backups backup /mnt/backup-drive/pve-backups
ExecStartPost=/usr/bin/restic -r b2:your-bucket:pve-backups forget \
  --keep-daily 7 --keep-weekly 4 --keep-monthly 3 --prune
# /etc/systemd/system/restic-b2.timer
[Unit]
Description=Run Restic B2 backup daily

[Timer]
OnCalendar=*-*-* 07:00:00
Persistent=true

[Install]
WantedBy=timers.target
systemctl enable --now restic-b2.timer
Store your B2 credentials and restic password in /etc/restic/b2.env with chmod 600. Do not hardcode them in the unit file.
Monitoring: know when backups fail
Backups that silently fail for weeks are common. Set up monitoring before you need to rely on the backups.
PBS built-in: Enable email notifications in PBS → Administration → Notifications. PBS will email on backup failure, verify errors, and GC issues.
Uptime Kuma push monitor. Add a push-type monitor in Uptime Kuma. At the end of your backup cron or systemd service, add:
curl -s "https://uptime.yourdomain.com/api/push/YOUR_PUSH_KEY?status=up&msg=PBS%20OK"
If Uptime Kuma doesn’t receive a push within your expected window, it pages you. This catches silent failures where PBS thinks it succeeded but the data is corrupted.
PBS verify jobs. In the PBS web UI, under each datastore, schedule a Verify Job. This reads every backup chunk and checks its SHA-256 hash against the stored checksum. Run it weekly. A verify job that fails means corruption — find out before you need a restore.
What this setup protects against
| Failure scenario | Protected by |
|---|---|
| Single drive failure | PBS local backup |
| Host hardware failure | PBS on separate machine |
| Accidental VM deletion | PBS snapshots with retention |
| Ransomware on host | PBS is separate system; B2 versioning |
| House fire / theft | Off-site PBS or B2 |
| PBS corruption | B2 restic copy |
The one thing this doesn’t protect: your B2 account getting compromised. Restic’s encryption ensures the data itself is safe even if B2 is breached, but an attacker with B2 credentials can delete your bucket. Enable B2’s Object Lock (immutable storage) on the bucket for protection against deletion.
Storage sizing reference
Running this on a homelab power budget? A small PBS node on a mini PC with a 4TB HDD adds around 6–8W idle to your setup — about $7–9/year at average US rates. That’s cheap insurance.
For datastore sizing: assume 2.5× the sum of all your VM/LXC disk sizes for 30 days of daily backups with PBS deduplication. A homelab with 1TB of total VM disk content typically uses 600GB–1.2TB of PBS datastore space for a month of retention.
Running Proxmox? The LXC vs VM guide covers when to use each for your workloads. For ZFS datastores under PBS, the ZFS on Proxmox guide covers pool setup, ARC sizing, and Sanoid snapshot schedules that complement PBS retention. For the off-site B2 restic copy in detail, see Automated Off-Site Backups with restic. The Power & Cost Calculator shows what your PBS node adds to your monthly electricity bill.
Sources
- Proxmox Backup Server Installation – official install steps for PBS on bare metal or as a VM.
- PBS Maintenance: Prune, GC, Verify – official reference for pruning retention, garbage collection, and verify jobs.
- PBS Managing Remotes and Sync – official docs for the remote and sync jobs used for off-site replication.
- restic Preparing a Repository – official restic docs for initializing the Backblaze B2 repository used in the off-site copy.
Frequently asked questions
Can PBS run on the same machine as Proxmox VE?
How much storage does PBS need per node?
Does PBS support incremental backups for VMs?
Can I encrypt backups on PBS?
What's the difference between a PBS datastore and a backup storage in PVE?
Evidence ledger
- Last updated
- Methodology
- This tutorial was written and edited by Lowell K. Wood IV in St. Louis County, MO. Specs, prices, commands, and version numbers are drawn from the official vendor, reseller, and project documentation current on the date above, and were verified before publishing. First-person hardware claims appear only where the article shows a verifiable artifact — a photo, receipt, or measurement — or links to the TechFuelHQ Open Bench Datasets. Every fact is human-verified against its cited source before publishing; AI assists with first-draft structure and source-gathering, not with the verdict. Full editorial standard: methodology.
- Update log
- 2026-07-25 — Last reviewed and updated.
- Corrections
- Spotted an error or stale price? Email hello@techfuelhq.com. Confirmed corrections are added to the update log above.